langton-ant-dojo
Dojo : TDD Against the Time with React and Redux
This project is maintained by Bogala
First rules and Component State
Some things before start
Today, we know how create a stateless component : a simple function.
const MyComponent = () => (
  <span>My component works !</span>
);
And how create a stateless component with props (optionals or not) :
interface ComponentProps {
  componentName?: string
};
const MyComponent = ({componentName = 'New Component'}: ComponentProps) => (
  <span> works !</span>
);
Before the next step in our application, we have to learn 2 functionalities in React:
- class components
- component state management.
From a function to a class
Take our example of component without props :
const MyComponent = () => (
  <span>My component works !</span>
);
You can convert it to class in five steps :
- Create an TypeScript class, with the same name, that extends React.Component.
- Add a single empty method to it called render().
- Move the body of the function into the render() method.
- Replace props with this.props in the render() body.
- Delete the remaining empty function declaration.
class MyComponent extends React.Component {
  render() {
 return (
   <span>My component works !</span>
 );
  }
}
Now, add props
interface ComponentProps {
  componentName?: string
};
class MyComponent extends React.Component<ComponentProps> {
  render() {
 let { componentName } = this.props; //destructuration
 if (!componentName) {
   componentName = 'New Component'; //define default value
 }
 return (
   <span> works !</span>
 );
  }
}
The class slightly complicates things : we have to define manually the default values and more lines of code are needed. But this is useful to implement a new react functionality : component state .
Adding a local state to a class
- Define a State interface and add a line with
stateto show a dateinterface ComponentProps { componentName?: string; } interface ComponentState { author: string; } class MyComponent extends React.Component<ComponentProps, ComponentState> { render() { let { componentName } = this.props; //destructuration if (!componentName) { componentName = 'New Component'; //define default value } return ( <span> works ! <br /> Thanks {this.state.author}. </span> ); } } - Add a class constructor that assigns the initial this.state:
interface ComponentProps {
  componentName?: string;
}
interface ComponentState {
  author: string;
}
class MyComponent extends React.Component<ComponentProps, ComponentState> {
  constructor(props: ComponentProps) {
 super(props);
 this.state = {author: 'Benoit'} as ComponentState;
  }
  render() {
 let { componentName } = this.props; //destructuration
 if (!componentName) {
   componentName = 'New Component'; //define default value
 }
 return (
   <span>
      works !
     <br />
     Thanks {this.state.author}.
   </span>
 );
  }
}
Note how we pass
propsto the base constructor:constructor(props: ComponentProps) { super(props); this.state = {author: 'Benoit'} as ComponentState; }Class components should always call the base constructor with props.
Update component local state
Now, we add and input to update author value :
interface ComponentProps {
  componentName?: string;
}
interface ComponentState {
  author: string;
}
class MyComponent extends React.Component<ComponentProps, ComponentState> {
  constructor(props: ComponentProps) {
    super(props);
    this.state = { author: 'Benoit' } as ComponentState;
  }

  render() {
    let { componentName } = this.props;
    if (!componentName) {
      componentName = 'New Component';
    }
    return (
      <div>
        <p><input type="text" value={this.state.author} /></p>
        <p>
          <span>
             works !
          <br />
            Thanks {this.state.author}.
        </span>
        </p>
      </div>
    );
  }
}
If you test this and try to update value, that doesn’t work. Why? The React one-way binding.
If you want update value, you have to implement the event onChange.
interface ComponentProps {
  componentName?: string;
}
interface ComponentState {
  author: string;
}
class MyComponent extends React.Component<ComponentProps, ComponentState> {
  constructor(props: ComponentProps) {
    super(props);
    this.state = { author: 'Benoit' } as ComponentState;
  }

  onChange = (e: React.ChangeEvent<HTMLInputElement>) => {
    this.setState({ author: (e.target as HTMLInputElement).value });
  }

  render() {
    let { componentName } = this.props;
    if (!componentName) {
      componentName = 'New Component';
    }
    return (
      <div>
        <p><input type="text" value={this.state.author} onChange={this.onChange} /></p>
        <p>
          <span>
             works !
          <br />
            Thanks {this.state.author}.
        </span>
        </p>
      </div>
    );
  }
}
You can try and enjoy !
Now you’re armed to start the next step.
Rules, expected behavior
Remember : our Langton’s Ant moves according this 2 rules :
- At a white square, turn 90° right, flip the color of the square, move forward one unit
- At a black square, turn 90° left, flip the color of the square, move forward one unit
Please implement this rules on play button’s click.
To illustrate, I have made an example mapping for 10 steps (You can use it to make your unit tests) :
| Step | Before | After |
|---|---|---|
| 1 | 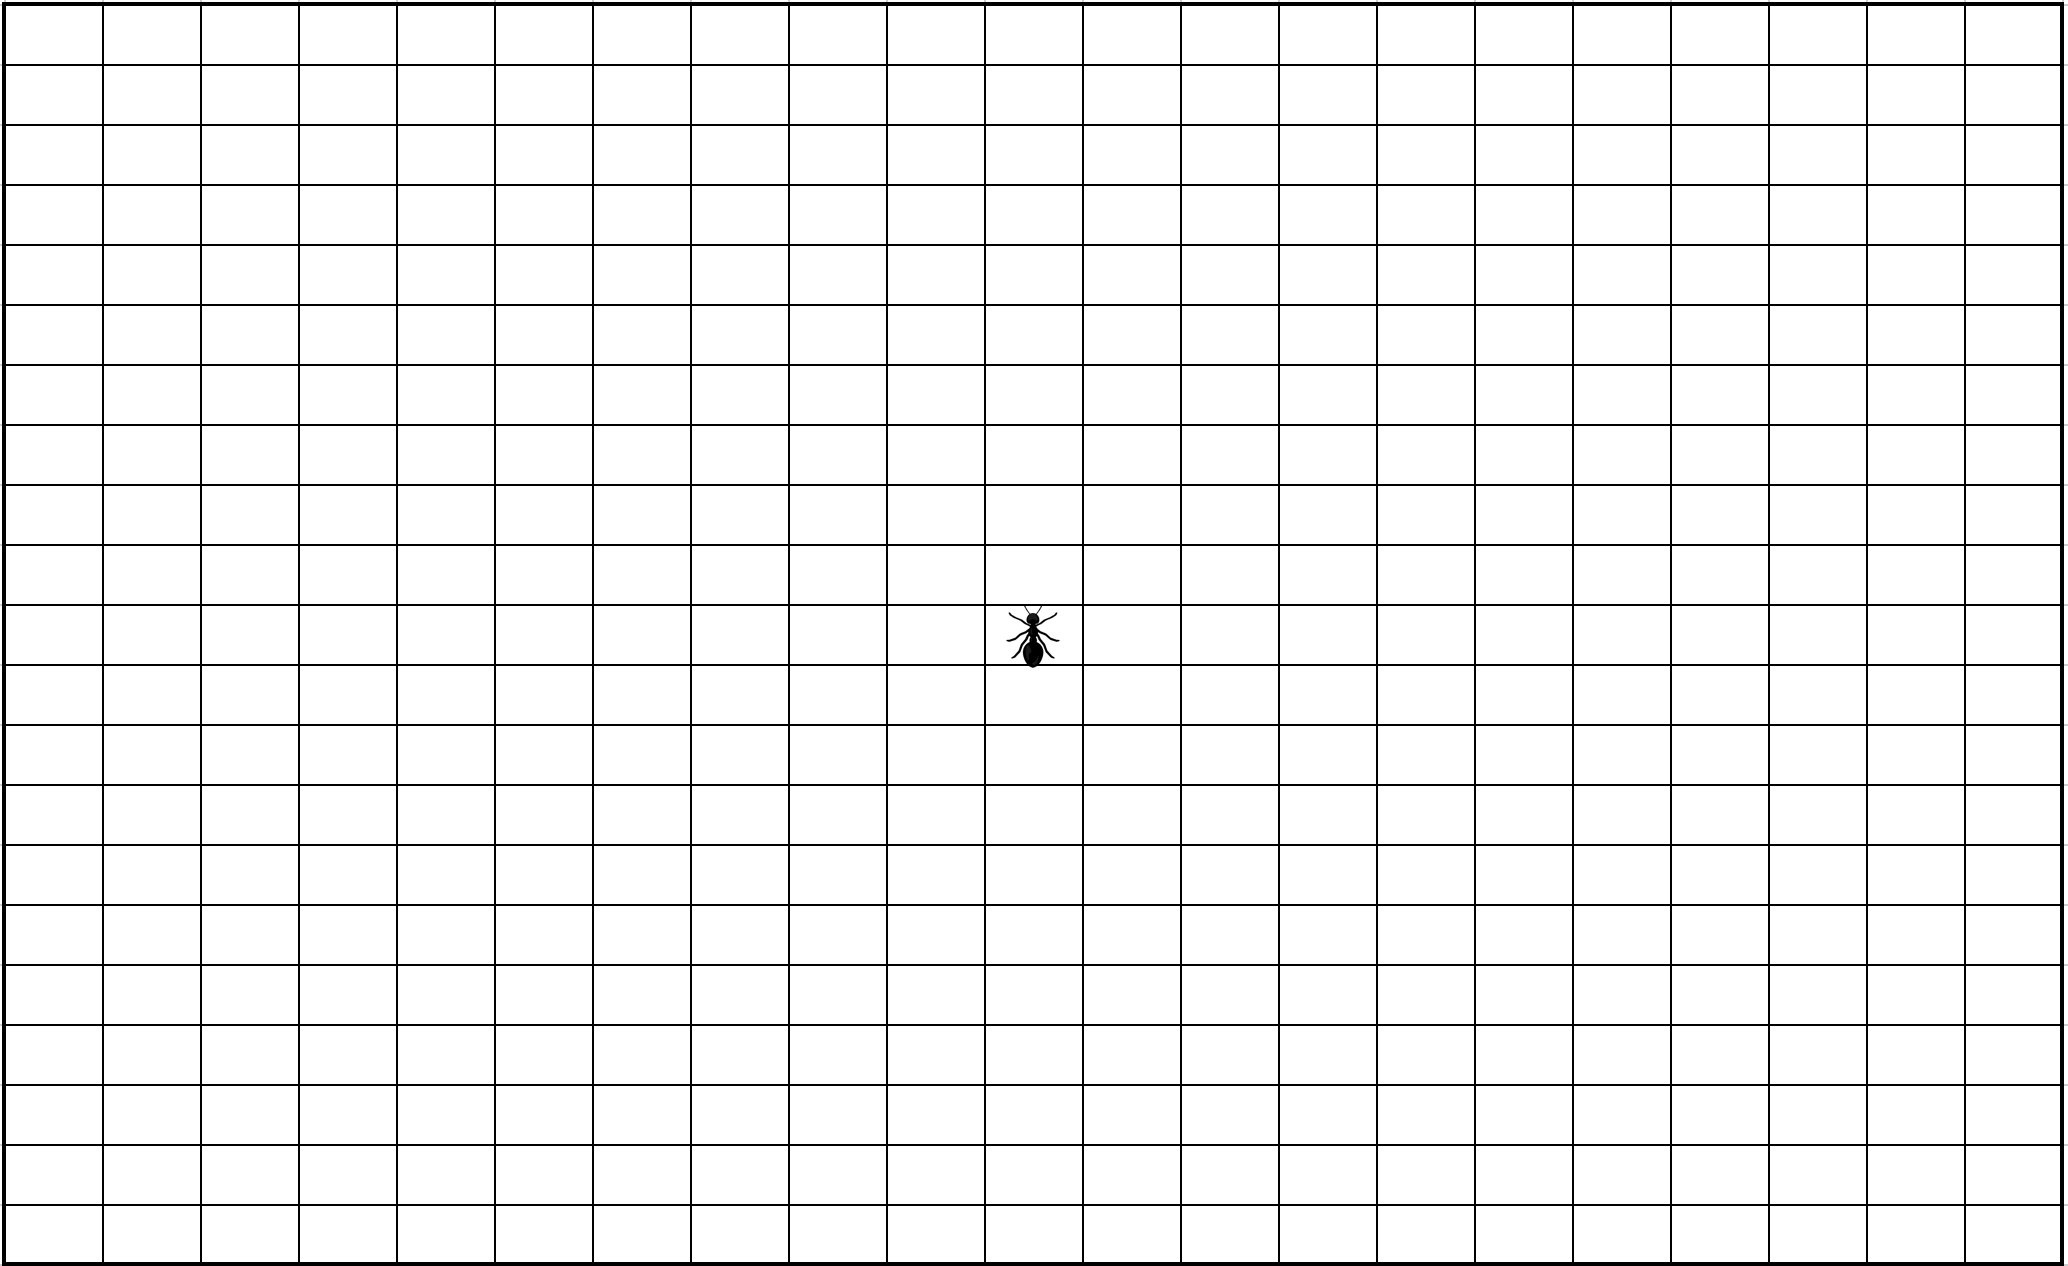 | 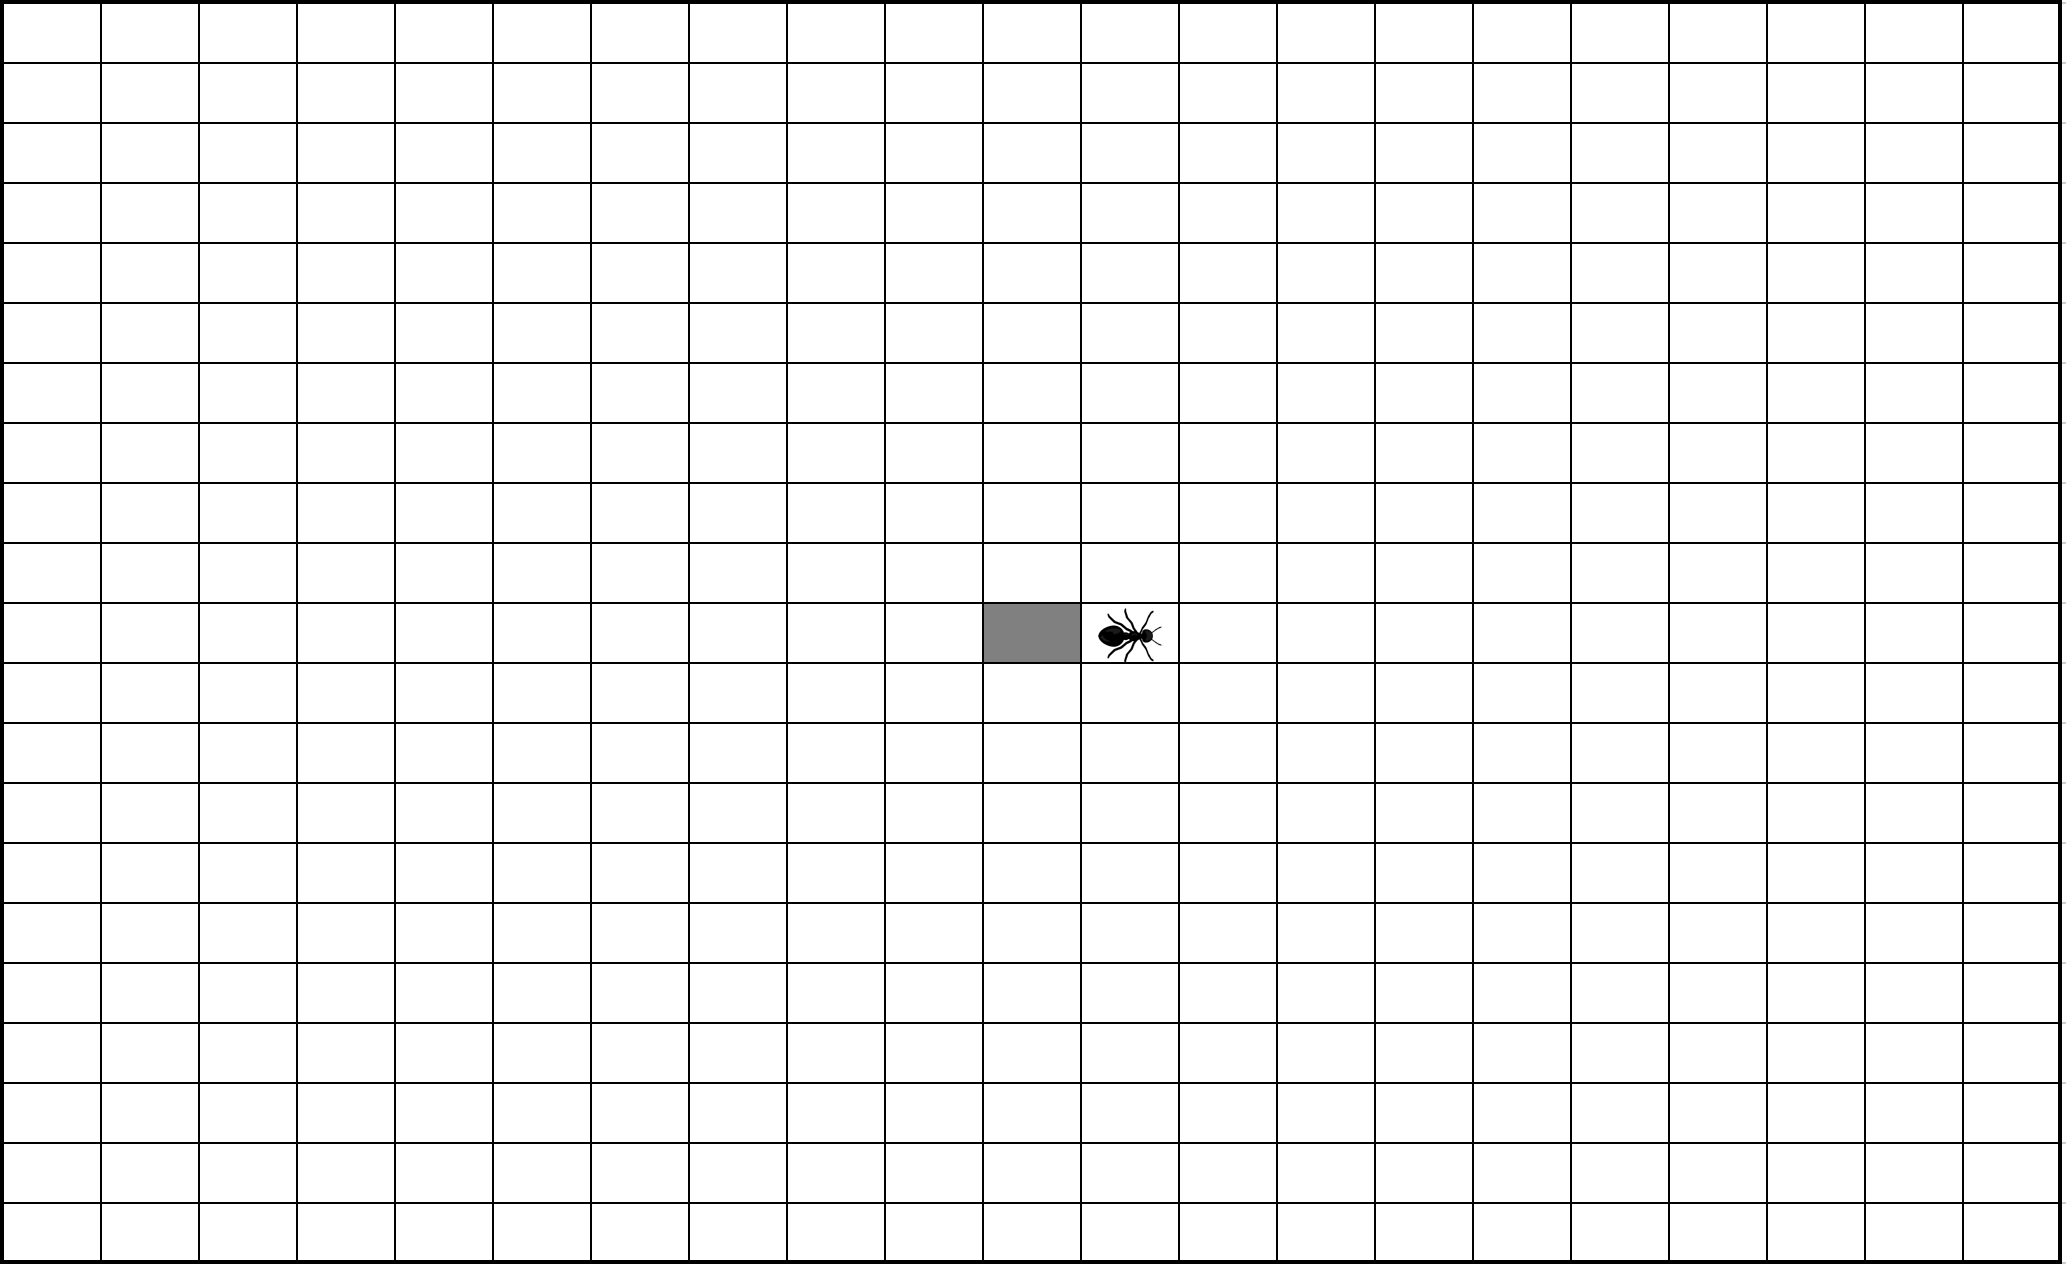 |
| 2 | | 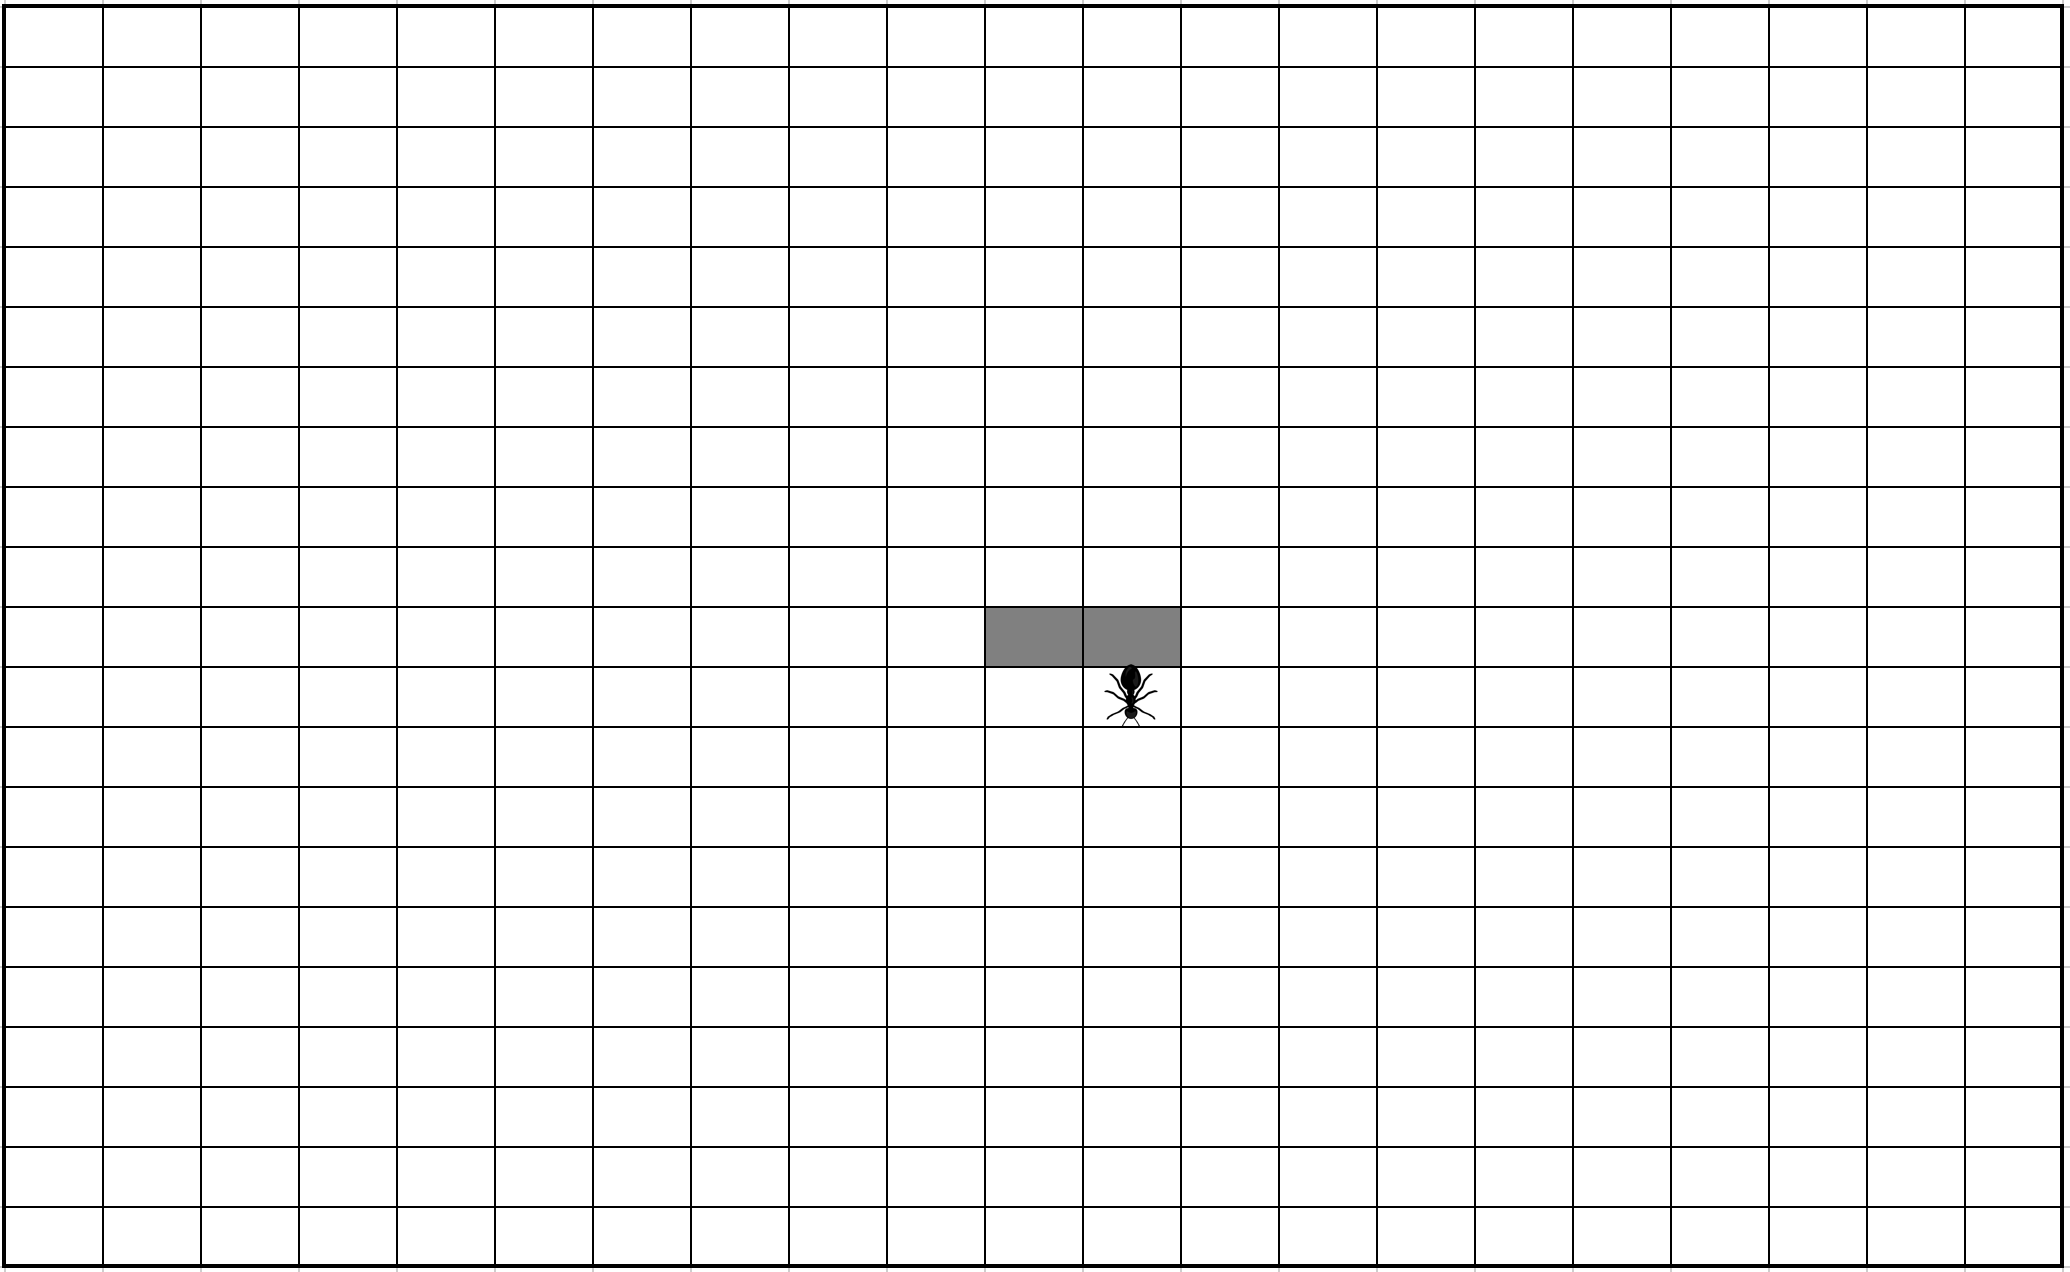 |
| 3 | |  |
| 4 | |  |
| 5 | | 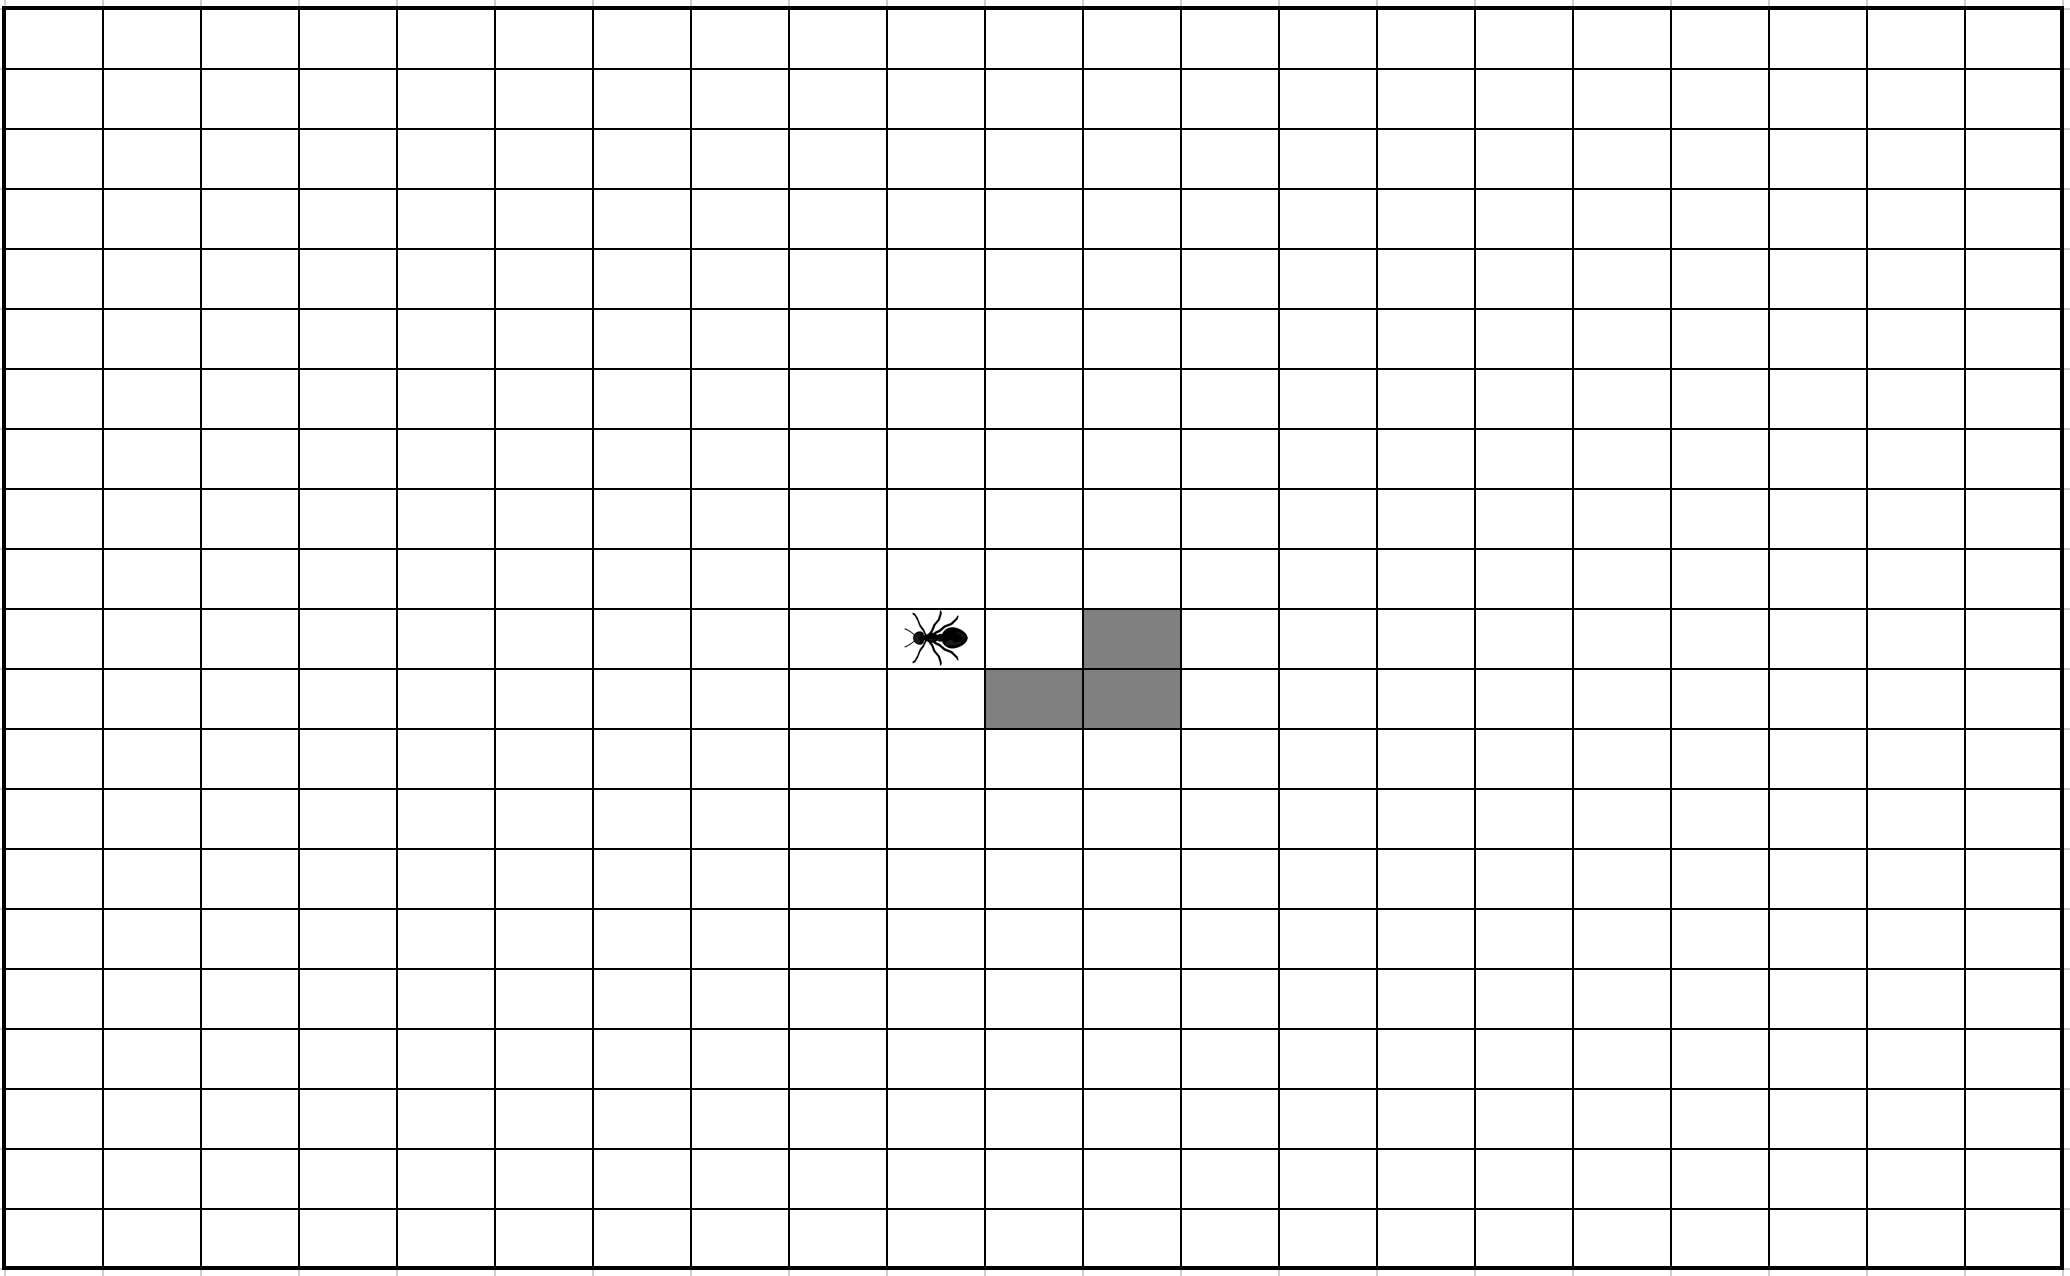 |
| 6 | | 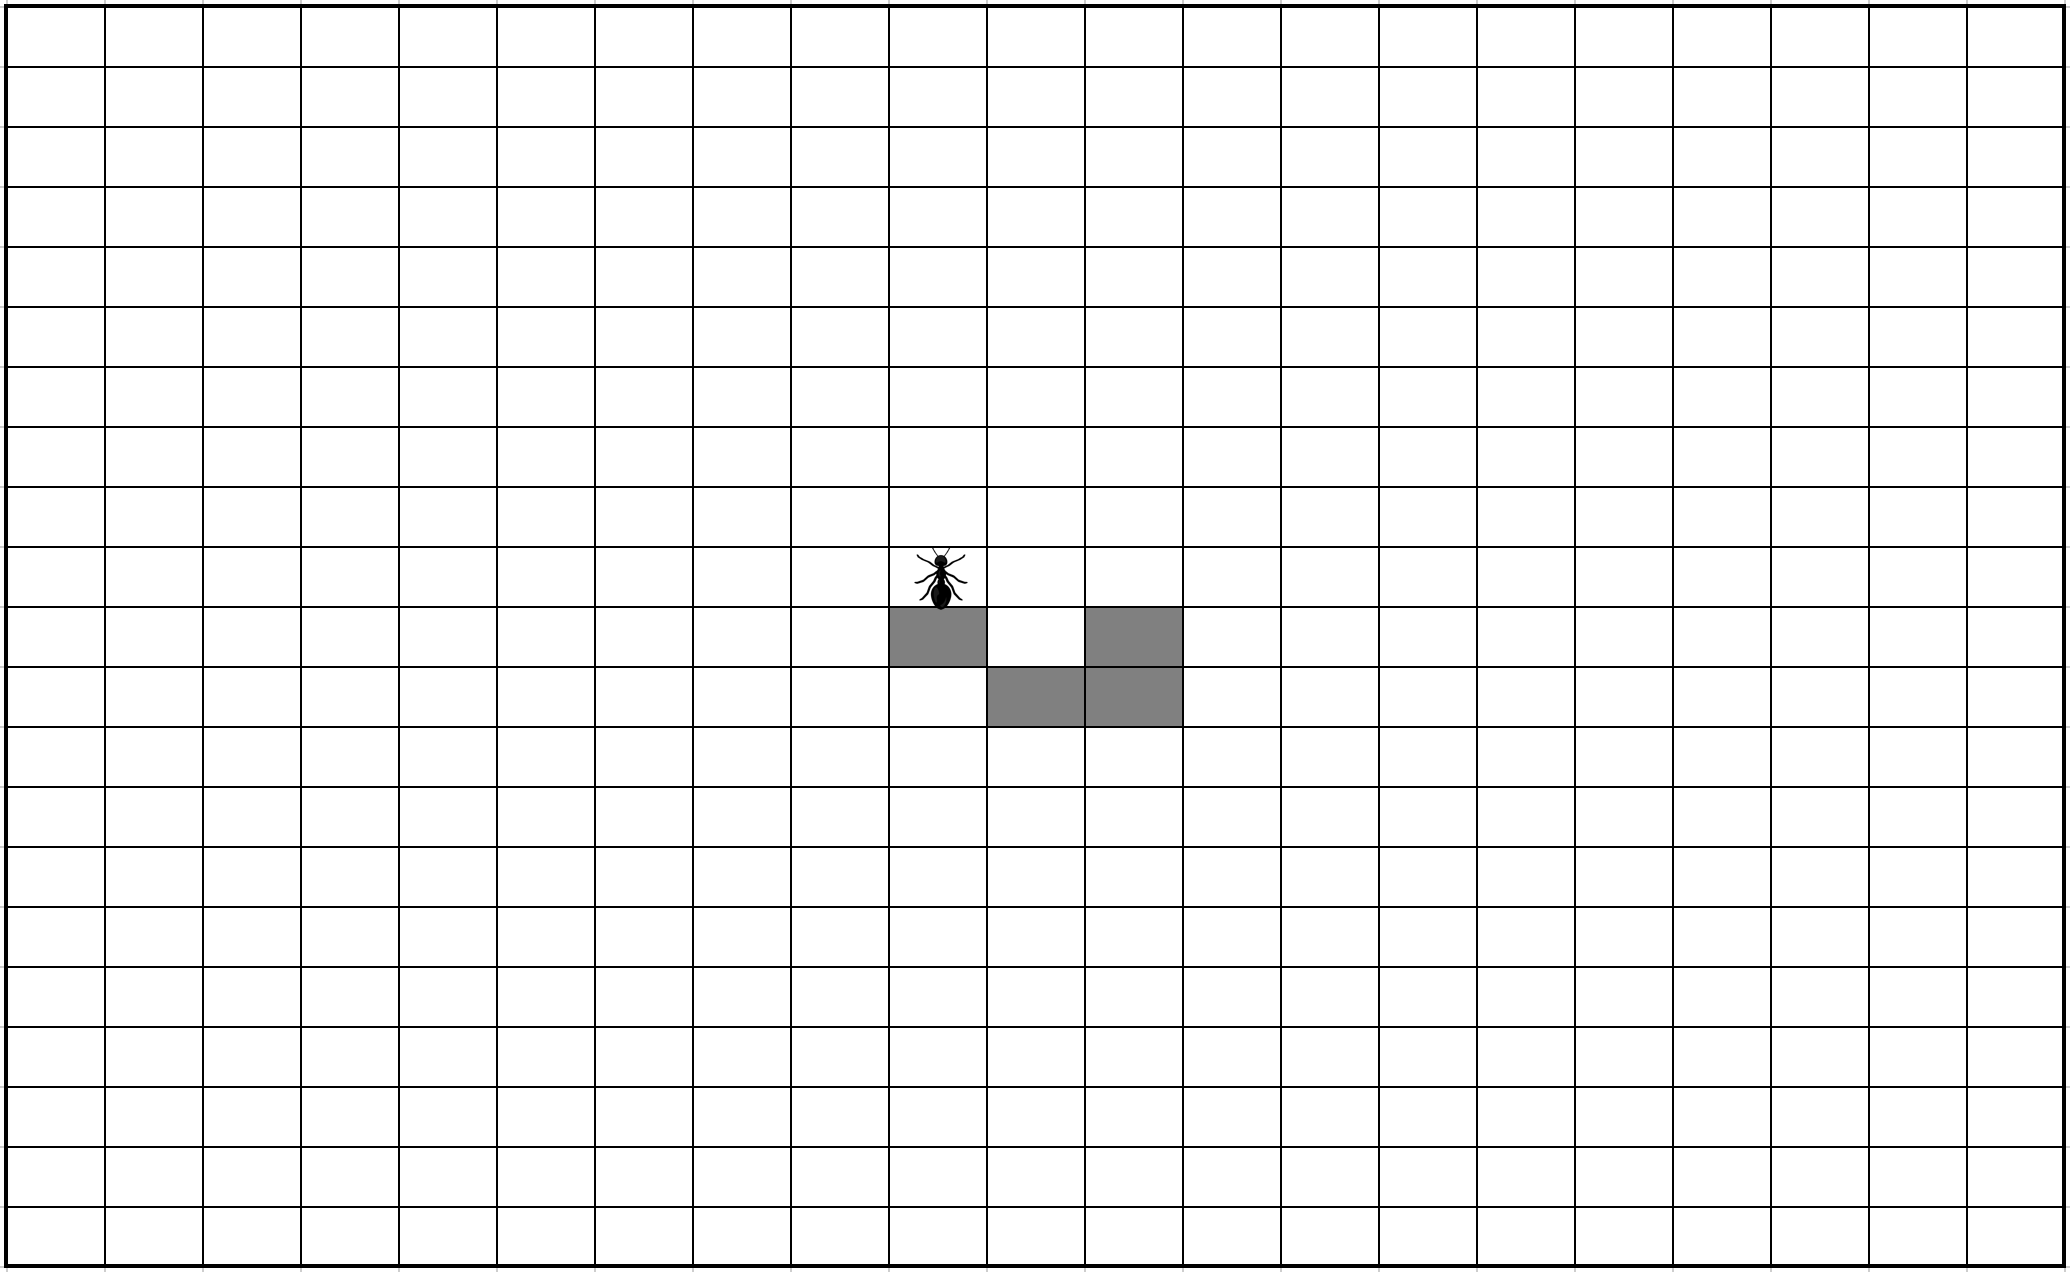 |
| 7 | | 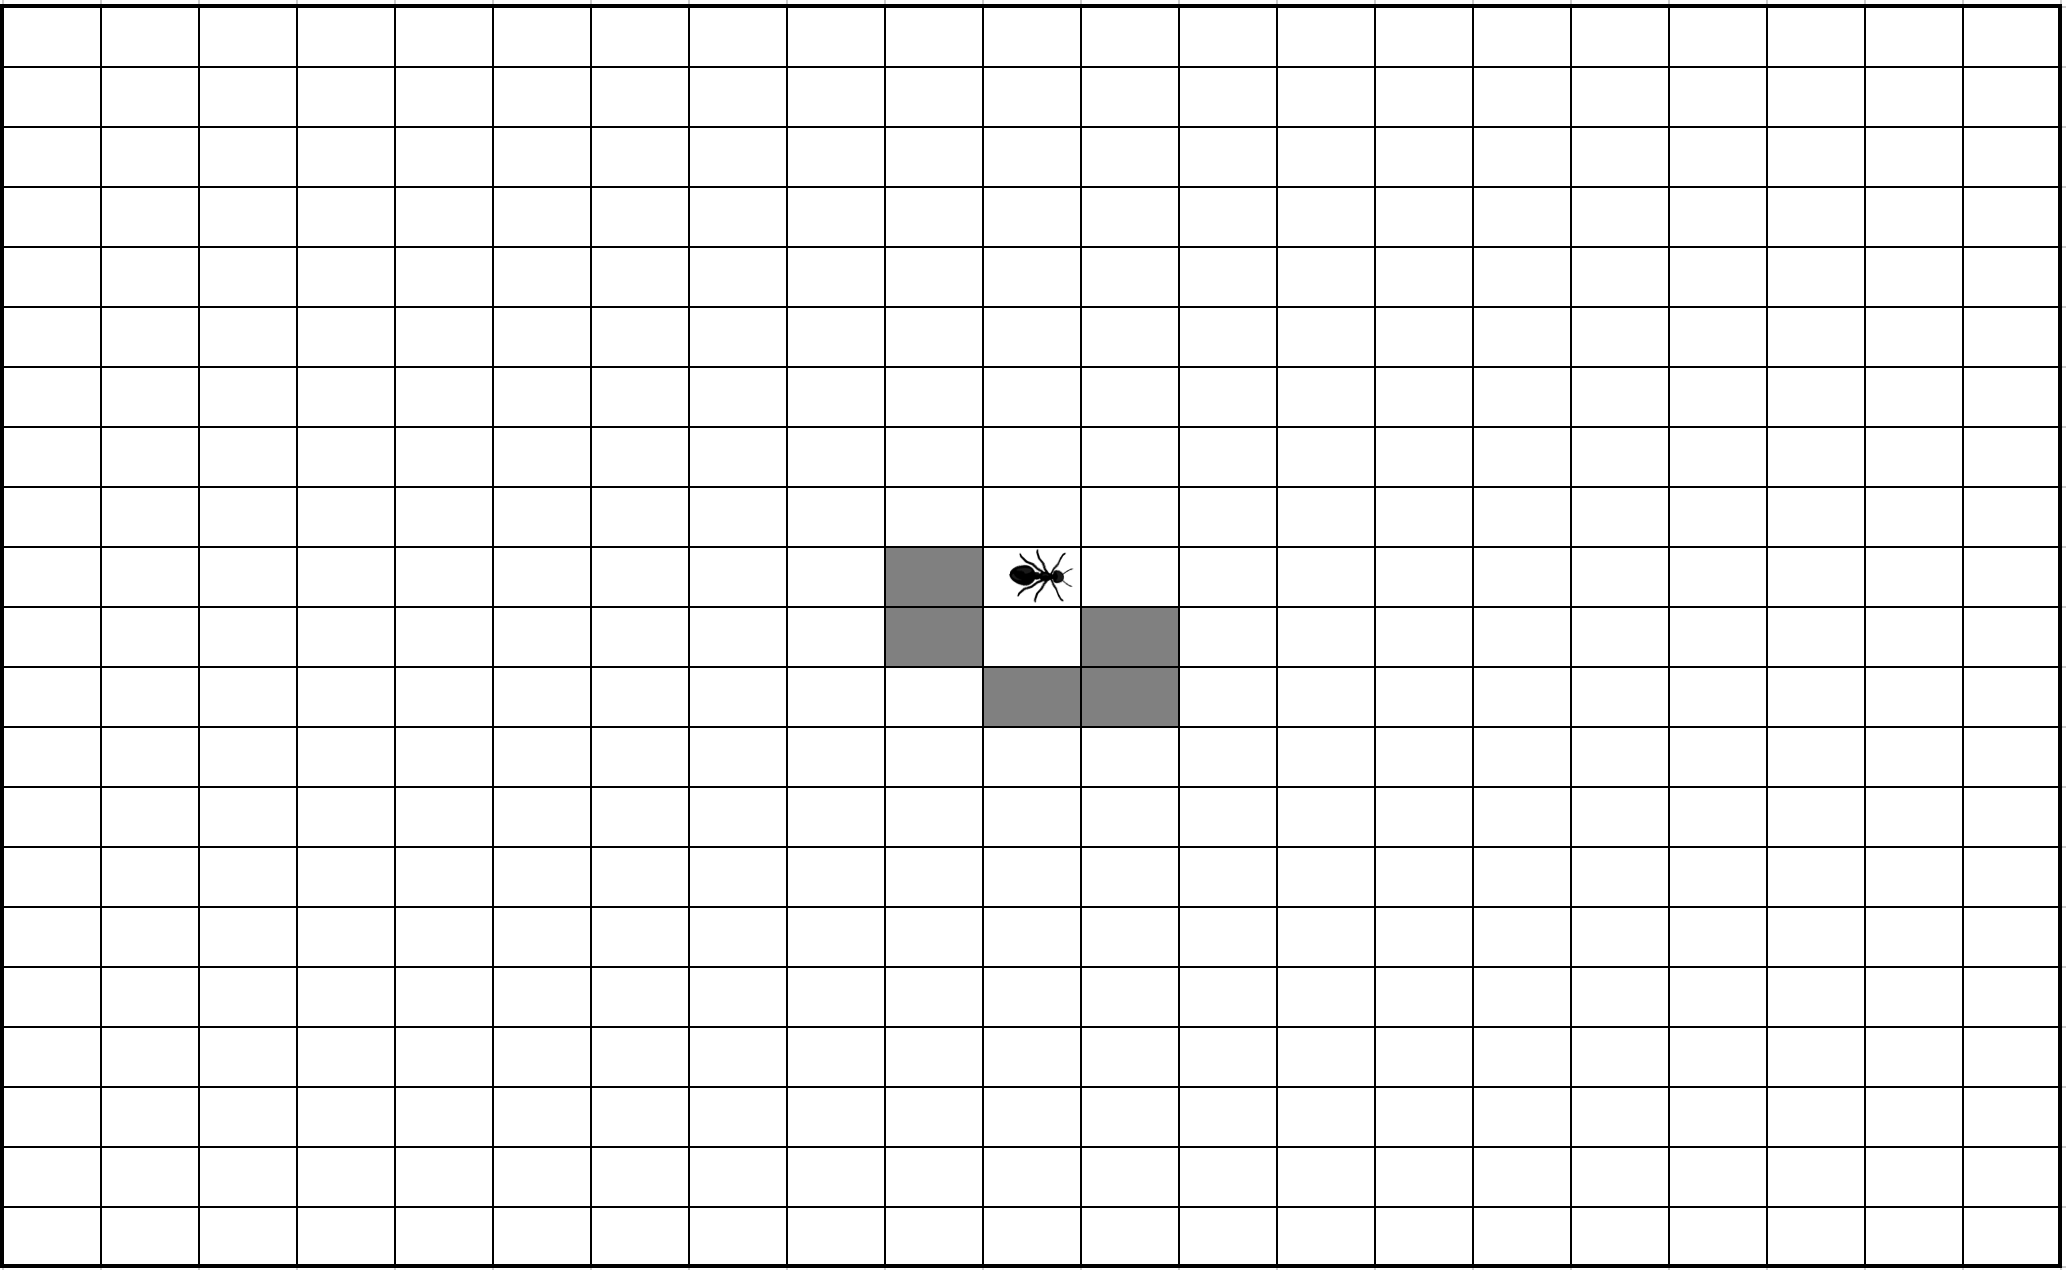 |
| 8 | | 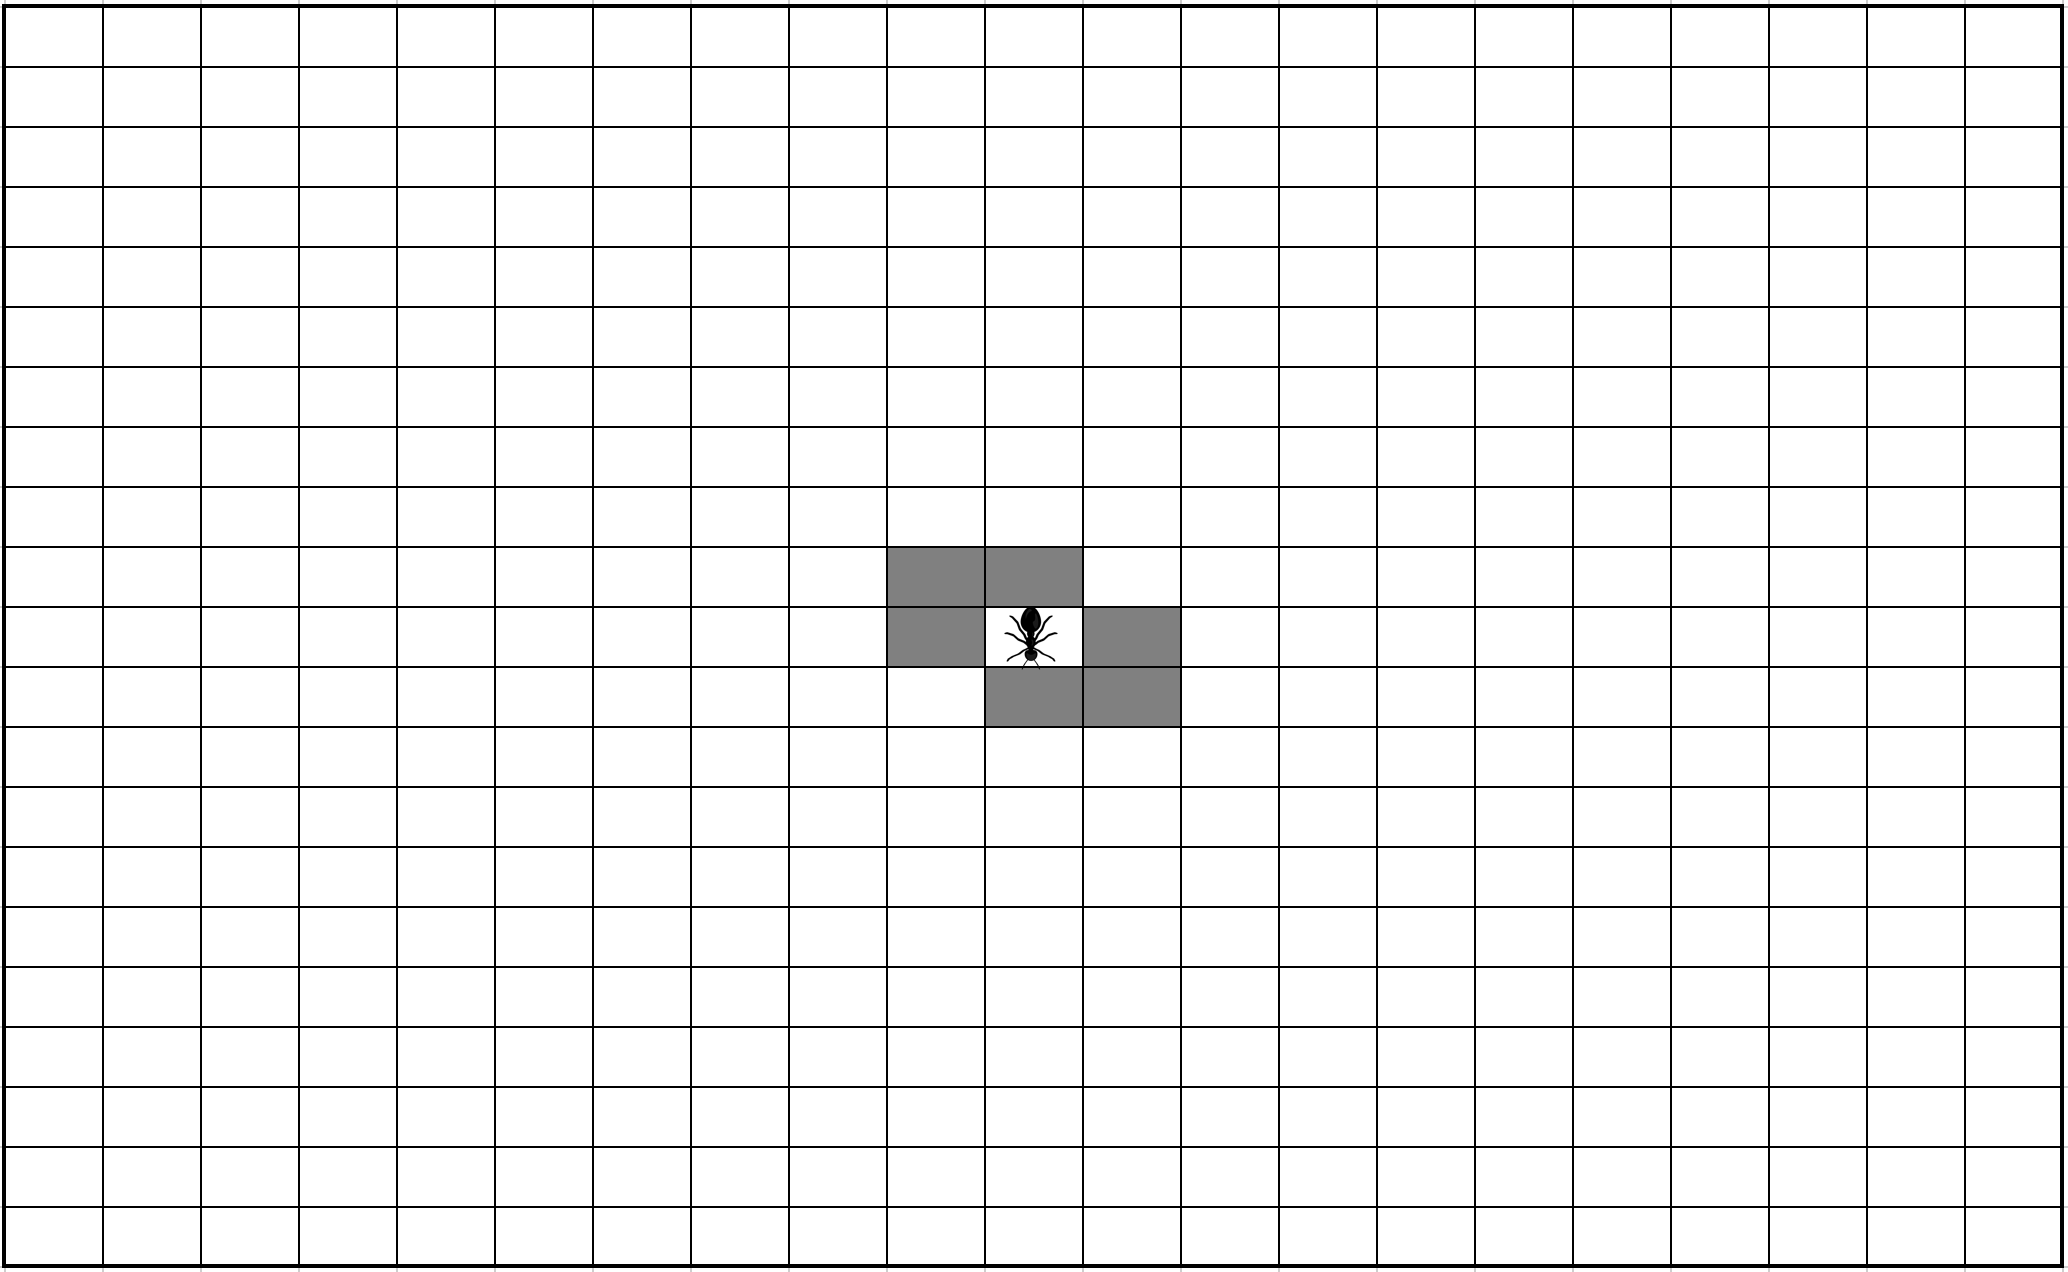 |
| 9 | | 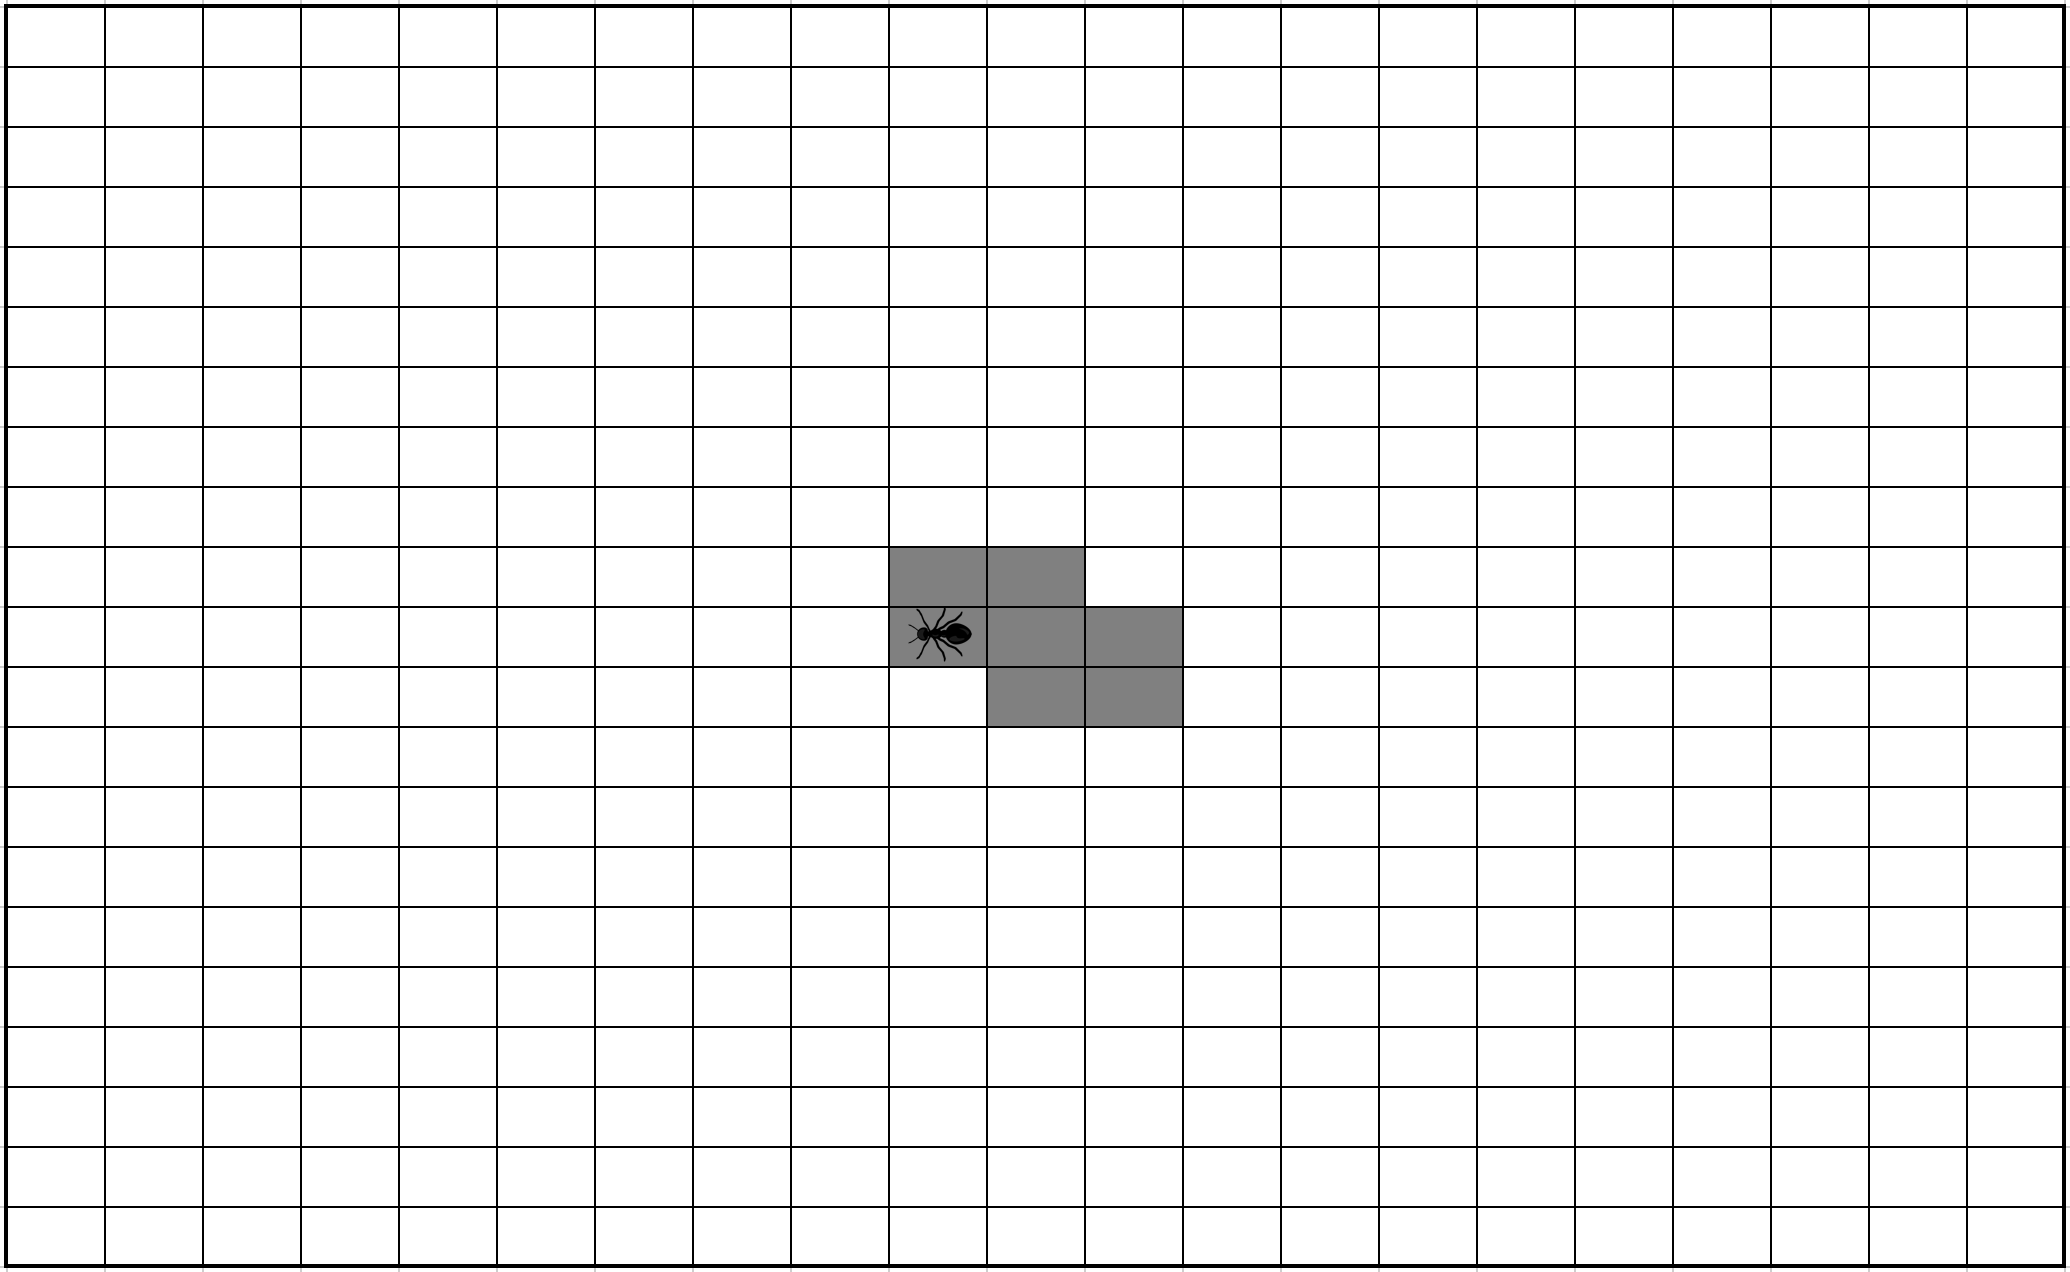 |
| 10 | |  |
YES ! Your ant moves by the rules. Now, it’s Refactor Time : next step : From Component State to Redux
Reminders
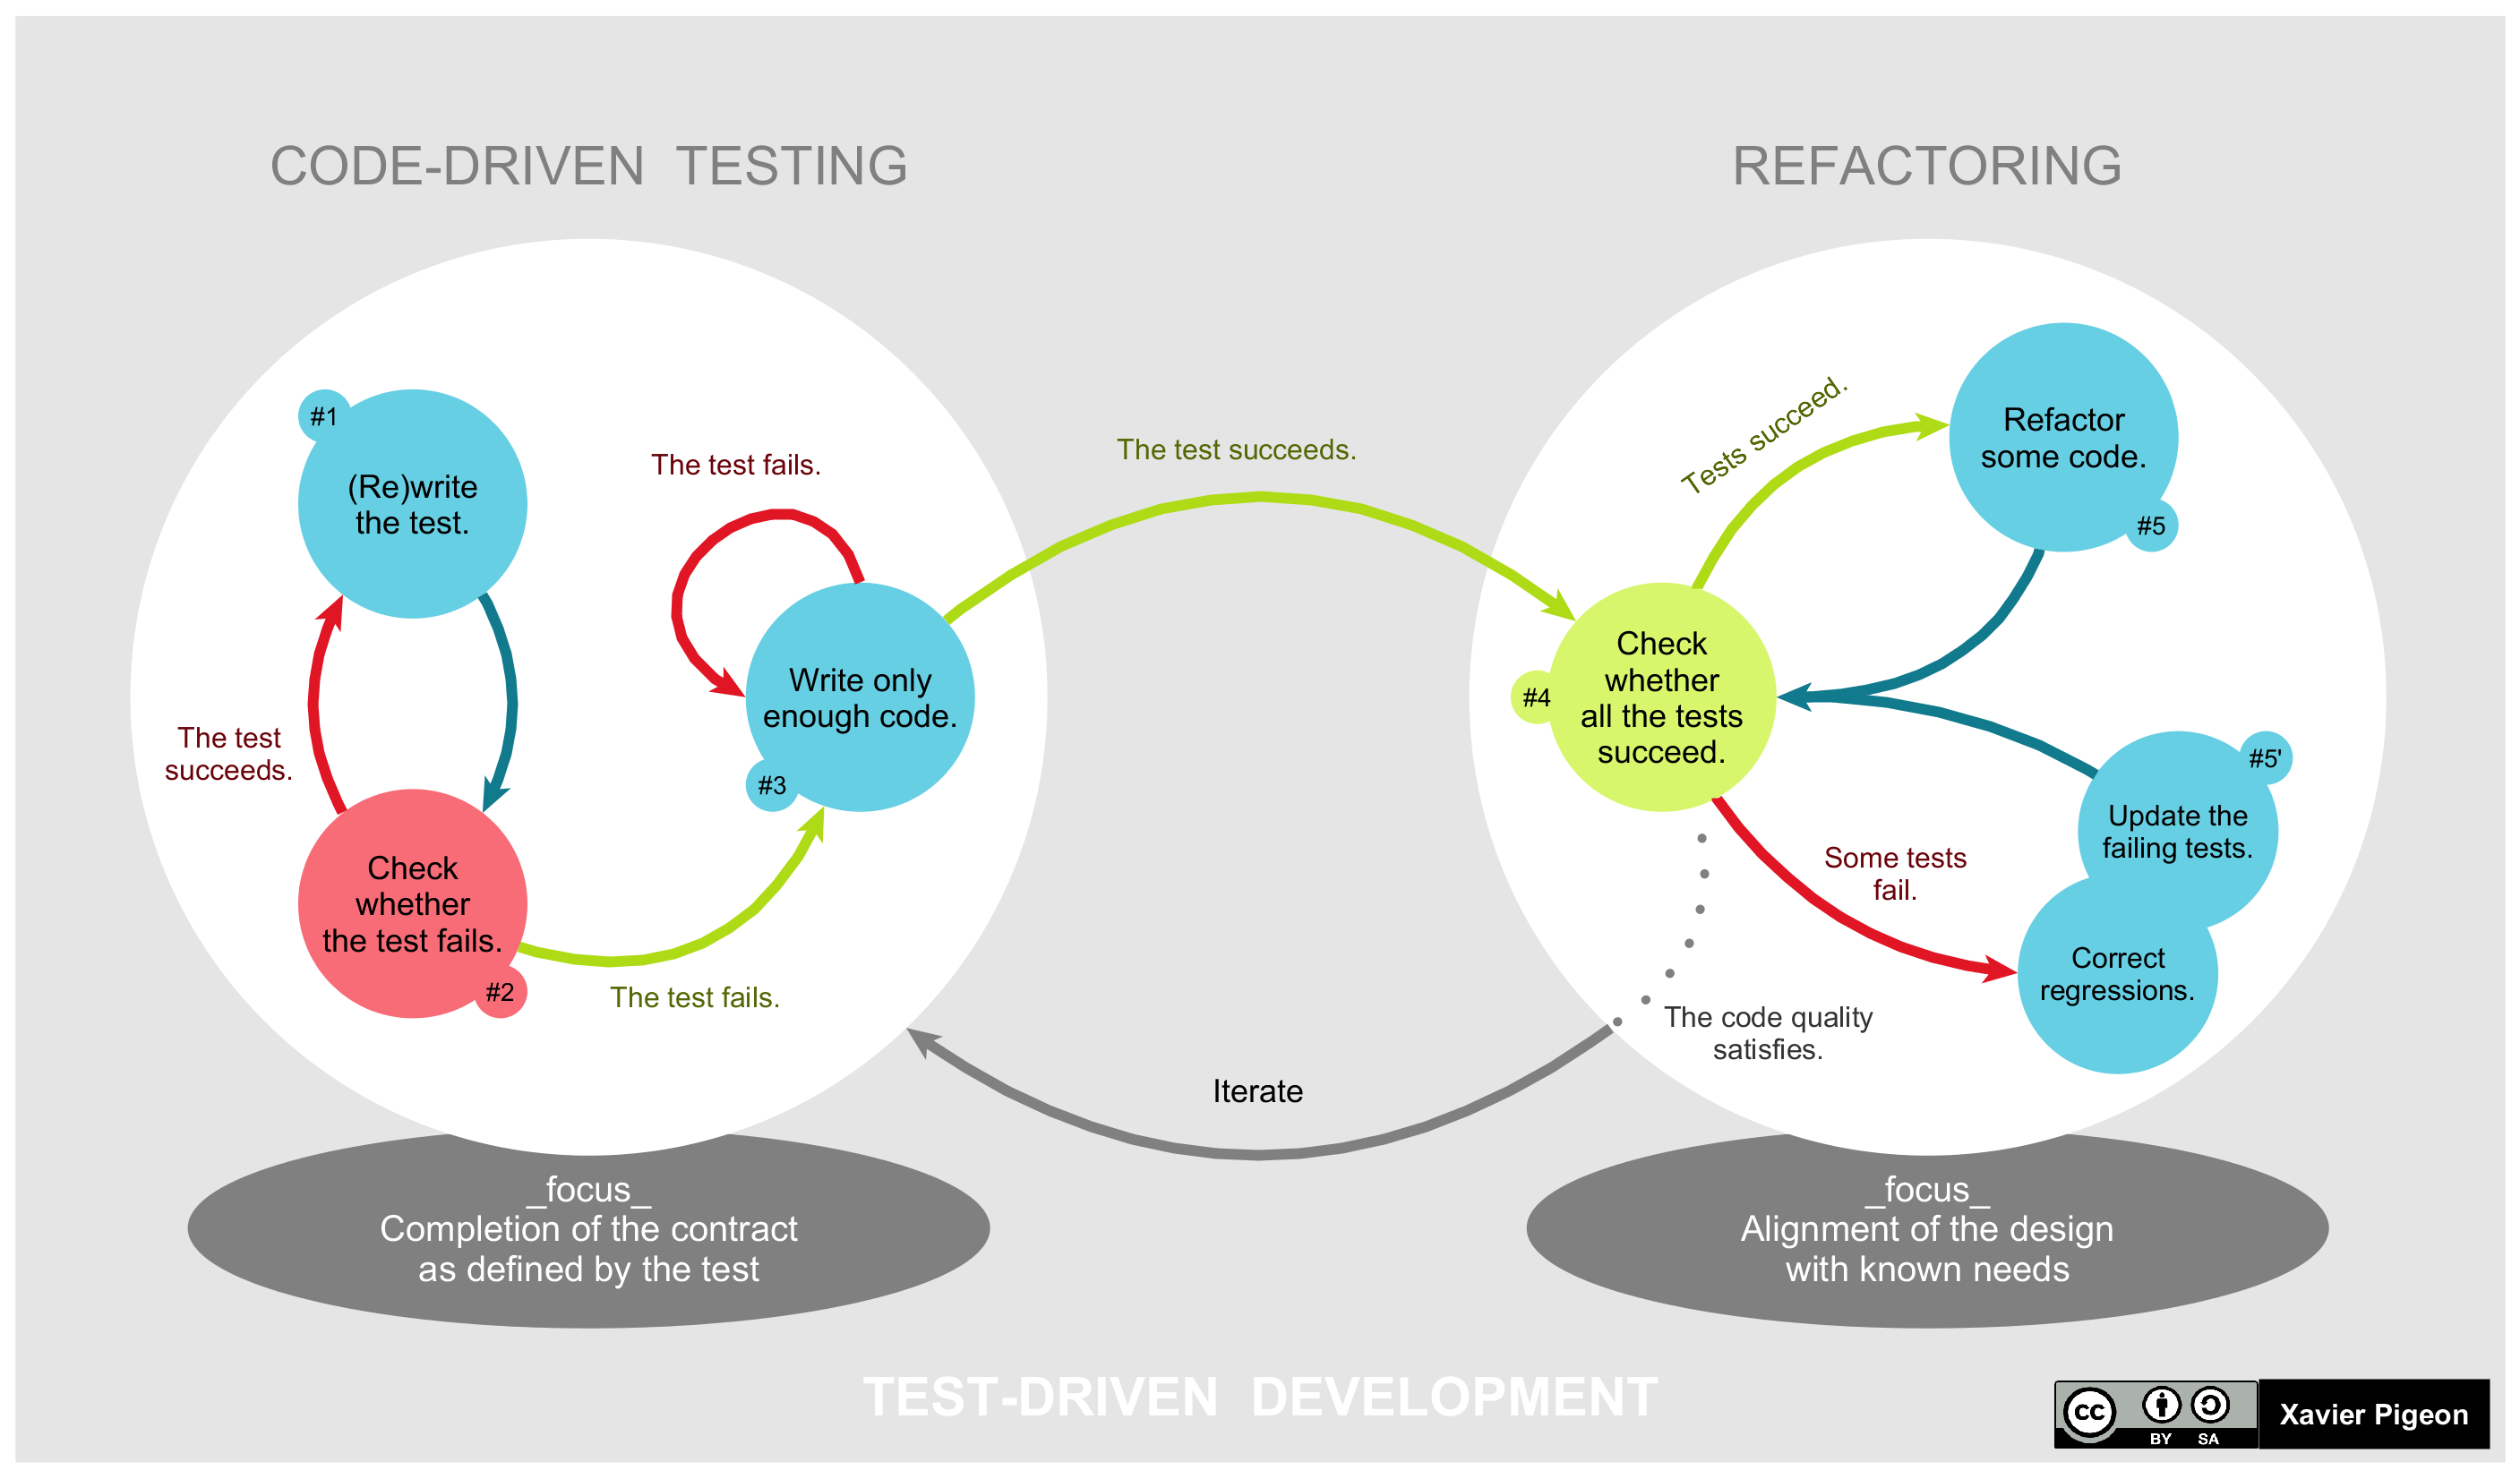 5 Steps to reproduce every cycle:
- Add a new test
- Run all tests and verify if the new test fails
- Write code to pass the new test to green
- Run all tests and verify all are green
- Refactor
Before each test, we launch a five minutes timer.
- If the code compiles and the tests are green, commit!
- Otherwise, revert!
All your code must be covered by unit tests.
We’ll avoid maximum any (implicit or not).